Showing posts with label presents. Show all posts

Thursday, December 23, 2010

Holiday Gift Book

For Christmas, I made this book for several people in my family. It celebrates their annual trip to Arizona to visit me each year since 1992. It has 38 pages (19 sheets of paper) with an inserted envelope. I purchased a packet of 5x7 cardstock in dark colors to make the assembly easier. I made four versions of this book that are mostly identical but have slight variations.

Holiday Books 1.

Because of the small page size and the large number of photos I wanted to use, I first reduced almost every photo to wallet size. This is easy to do if you have photo editing software. First, create a blank picture file (canvas) that is 4x6. Then open each of 4 photos and adjust the file size down to 2x3, copy the photo, and paste it into the new file as a new layer. Move them around so they all display in the new file. If this is too much work for you, Walgreens online photo service will make wallets from your 4x6 photos for $1 each. I'm sure other online photo services have similar services to make wallets.

Most of the recipients are guys, so I didn't want to use my personal style of page adornment that is normally heavy on flowers and frills. Instead, I went with a plain style that is more industrial. Tim Holtz various trinkets are great for this. I used plumber's chain to attach a subway token, a swimming pool basket tag, and a word doodad to the cover of each one. I selected words that related most to each person.

Holiday Books 2

I also refrained from adding ribbons, yarns, and other frilly trims from the pages.

Each page is different color, which means that each two-page spread includes two different colored pages. The varigated colors make a fairly smooth transition on each spread. However, if I was going to redesign this book, I'd add in a common element like a constrasting paper or emphemera that would unify the spread with differrent background colors.

Holiday Books 4

I put 1 to 4 of the wallet size photos on each page. On pages with 1-3 photos, I added other content including stamps, library pockets, coin envelopes, and velum pull pockets (the size of credit card holders). I also used rubber stamps to add words to nearly every spread. Having a nice selection of travel-related stamps really came in  handy. I also used some 4x6 photos as the main image on a page. I frequently overlapped this image with a wallet image that provided detail for the story on that page.

To tell the main story, I wrote up my commentary on the photographs in Microsoft Word using a nice display font. I kept the lines shorter than 5 inches so they would fit nicely on the 7 inch wide papers. I typed them single spaced and then cut them out freehand (using scissors) into word strips that I glued onto each page. I staggered the layout for emphasis, sometimes running words at a slant. The words are sometimes on the background, sometimes on the photos, and sometimes overlap the various components. I had planned to distress/chalk the edges, but because of the small size of the stips, it seemed to compete with the words on my trial page, so I abandoned this strategy.

Holiday Books 5

I created the covers using book board (heavy chipboard) cut so it would slightly overlap the pages. I applied the crocodile paper to the outsides, and used a different inside paper selected for each person. I assembled the book by punching two holes in each page and cover, and used book rings. I only have 1 inch rings, but plan to upgrade them to 1.5 inches to allow the books to lay flat.

Next to each photo, I hand wrote a caption that identifies the location. My handwriting isn't expecially nice or regular, but I like the hand writing touch on the pages. I also like the slightly irregular cutting on the word strips, and a few other elements that really help to give the books an assembled feeling. I wanted it to seem more like a book that had been made over time than a project I cranked out over a few days. I like the journal aspect of this.

The books contain several coin envelopes and a library pocket where they can add their own trinket items. In a velum pocket, I've included 8 business cards from places we visited. The last page is a policy envelope with a string closure. It's not quite big enough for a 4x6 photo, but it can hold many smaller items. I didn't include journaling places because I suspect that my family members will not write in these books.

Holiday Book 6

I used travel brochures on many pages. I picked up multiple copies so I could use the same brochure section in each duplicate book. These were perfect for filling in the content of the book because they were for places we visited. You can use any kind of ephemera for a similar project.

Sunday, December 13, 2009

Presents! Presents! Presents!

I've been super busy the last few weeks making holiday presents for my family. I've got some pictures to share with you here.


One of my nephews is a sports nut, especially baseball. Not only does he play, but he coaches and umpires. His family makes an annual trip to Chicago to watch his favorite team, the Cubs, play in Wrigley Field. This is a concertina with plain pages so he can insert any pictures he wants, and I've assumed they will be related to baseball. In the back, I've created a photo holder envelope out of double side printed cardstock. That's the tab you see sticking up in the back.


The next project is for a niece who is a senior in high school this year. It's a coin envelope book with a magnet closure with lots of tags inside. This image is the top half of the book with details. I trimmed down the envelopes so a #5 shipping tag would fit inside nicely, and designed the book around the envelope size. There are three kinds of yarn sticking out of the top from the tags. I do like a lot of yarn frilly stuff.


Here's a view of the bottom details. I used the outside paper to make the simulated tape holding the pieces together. That's why they blend into the cover. I also stamped related bird images along the front of each envelope with coordinating birds stamped on the tags.


Here's a view of the envelopes and tags and their stamps. I used several colors of the Tim Holtz inks to distress the entire project at each phase. This was my first envelope book, and I was working out the engineering as I went. As a result, this project is more of a prototype for future envelope book. I'm really pleased with how the magnet closures work, but next time, I'll hide them under the paper. I've got an idea for digging out some of the cardstock so it might even be flush with the surface. New ideas to try on future books.

Last year, I made this niece a book and filled up the pages with quotes that I thought she would enjoy. This book is blank so she can make her own mark on the world. I only hope that she really will use it! After seeing my handwritten quotes last year, perhaps she won't be afraid to write in this one.


This is the project I'm most excited to share. My oldest nephew got engaged about a week ago, so this is their first Christmas together as soon-to-be-newlyweds. I wanted to give my future niece-in-law a gift to help her mark this stage of her life's journey. It's a lunchbag book designed to collect information about their holiday traditions as a couple. Each two-page spread covered a different aspect of the holidays where she can record details and tuck away mementors, including:
  • holiday decorations
  • special events they attend
  • favorite holiday music (with a place to put in a CD)
  • Christmas eve events
  • Christmas day events
  • favorite recipes (with a deck of recipe cards)
  • special memories
  • holiday magic


I love the juxtaposition of such precious memories into such a routine object that seems to be temporary. I constructed the individual bag pages and only sewed the segment together at the end. I was planning to tie a narrow wire-rimmed red ribbon along the spine, but now that the book is finished, that seems like too much frilly stuff. I selected the papers from my stash and matched them to the recipe cards I found at Hobby Lobby.

{Note: I've added a few more pictures of the Holiday Traditions book. Click on any picture to view a larger version of the photo and see more details.]


The bottom of the lunch bag makes a natural flap on some pages. This spread gives her room to write in their holiday decorating traditions. And the facing page allows her to add a photograph.


This spread allows her to record the names of their favorite holiday music. Because my nephew is a band director, I'm sure music will be a part of their lives. On the right page, I've added an image cut from a Christmas card I received years ago. Behind that image is the lunch bag top, so the can slide in a CD of their favorite holiday songs to really record the memories.


This spread has the bottom of the bag on the left page. She can write on these pages things like their Christmas morning menu, or put in pictures. I've created a recipe holder by punching holes into recipe cards and inserting a book ring to hold them together. I'll slide the recipe cards in between these pages.

Saturday, December 20, 2008

San Francisco Travel Memory Book


I'm too tired tonight to start the next project, so I decided I would blog this one and then hit the bed. I've already triaged my holiday gifts, and I'm going to call people tomorrow and explain that I don't have their gift done, but will finish it after I return to Phoenix. I'm sorry it has come to that, but I won't drive myself crazy to finish projects when I know people won't mind at all.

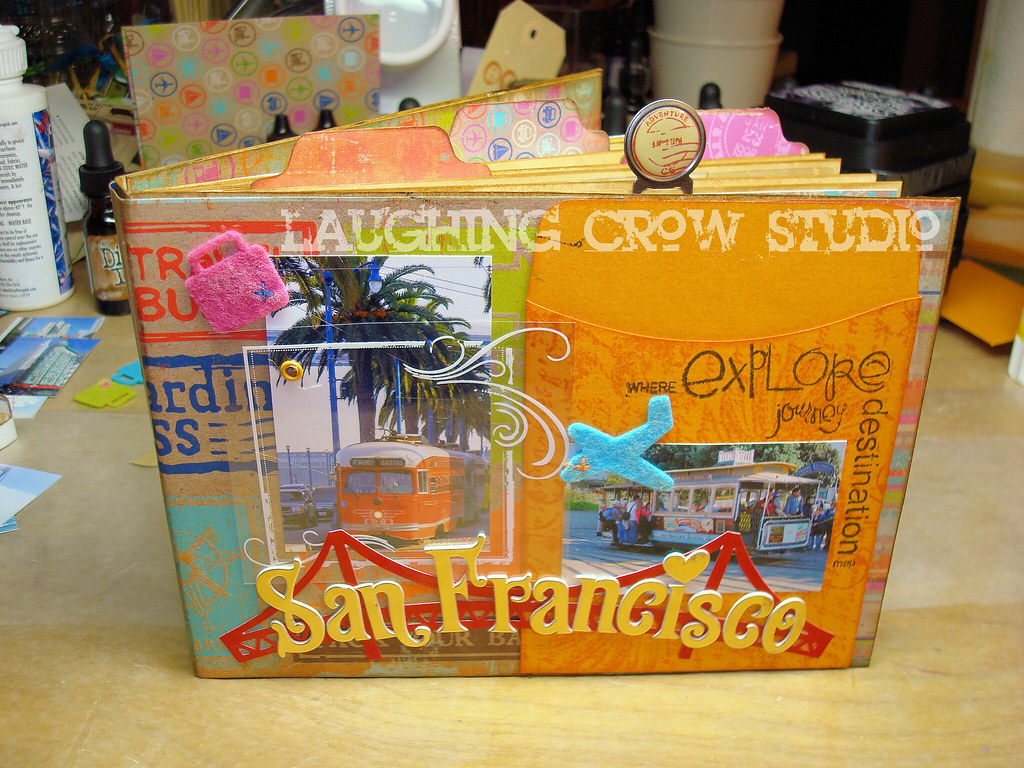
So, here is the second finished holiday gift for my family. This one is for my sister. She visited San Francisco this year, and hasn't done anything with her photos. I've made this book using a combination of travel guide pages, scrapbook papers, and photographs (reduced in size to act as embellishments). She can add 12 of her favorite pictures into this book.


This book doesn't have much dimension on the cover, but I did add a few layers. Notice the screen over the cable car picture (white scroll box) attached with an eyelet. I'm going to make a tag book to go inside the library pocket on the right (Bazzill).


As usual, I've added tags and tabs and clips along the outer edges of the pages along the top and side. I love the way this adds dimension to the book. I really love the grungy, distressed character of the paper, and have used the Tim Holtz distress inks to add to that feeling. The brown is Brushed Corduroy, and I've used it everywhere. I used a stamp to make the tabs out of the remnants of the scrapbook paper series.


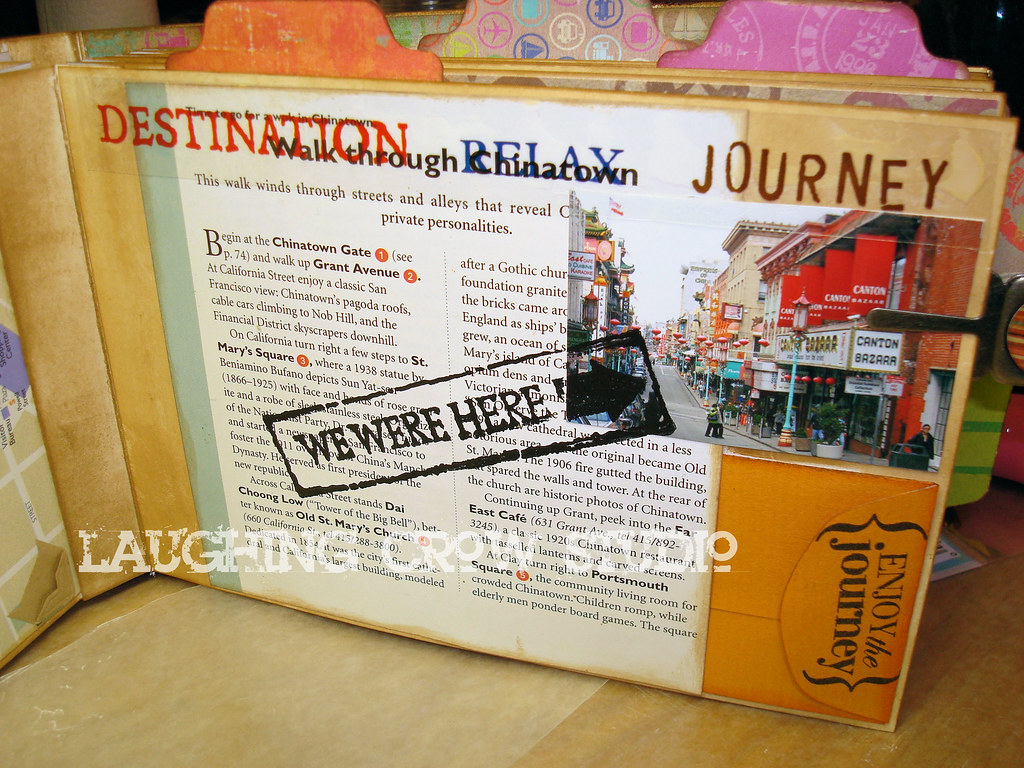
Here's a page based on a travel guide page. I've used the description of Chinatown along with a reduced photograph from Chinatown, and added a small coin envelope (Bazzill) so she can tuck away a small treasure or two. I used Stazon ink to stamp over the glossy travel guide page and photograph.

There are more pictures on Flickr.

Saturday, November 15, 2008

Project: Accordion Book with Tag Book


I had a blast making this gift. First, the people receiving it have been kind to me at a time when I was struggling, and I appreciate that kindness. But building on what I've been making, and taking it to the next level, was such a stretch. It's an amazing thing to watch myself build skills in both design and execution. I'm really proud of everything I've made this year, but I feel this one is the one where the design I see in my head is very nearly the design I hold in my hand. I'm closing that gap (even as the designs in my head get better and more complex).


This is another accordion book that open both from the top and the bottom. I put a 7 Gypsies book belt on this one to hold the contents together. It's slightly off center, and I laid out the cover to accommodate this element. The cover contains two photographs trimmed down and distressed. The Bazzill library pocket is stamped with a Tim Holtz stamp using Peeled Paint Distress Ink. The pocket holds a tag mini-book (see later photo for details) with various ribbon, yarn, and a few Tim Holtz distress elements danglies. The ribbon across the bottom wraps around the front cover, and holds the paper flower with a crystal brad. I used Glimmer Mist (Patina and Coffee Shop) on the paper flower to make it blend in a bit more with the cover elements. A stamp, a compass, and a Chinese coin round out the cover.


The tag book is made from manilla tags that I've sprayed with Glimmer Mist (Patina and Key Lime Green) and then stamped with various stamps using Tim Holtz Distress Ink in Peeled Paint. They are stamped on one side and have Glimmer Mist on the back side. My thinking is that they can add pictures on the stamped side and write on the back. The tags are bound with a ball chain (which I trimmed down) and adorned with yarns and ribbons and danglies. I tried to make this gender neutral, but I couldn't help myself with the yarns. There are six tags in this book.

The interior pages I used Glimmer Mist (Patina and Robin's Egg in one direction, Patina and Coffee Shop in the other) using Tim Holtz masks with the clock face and gears. I added tabs and other page marking items. When you open the book from the top, it contains a photo holder that I also distressed and painted with Glimmer Mist so it blends into the rest of the project.

More pictures available on Flickr.
Project code: 280111

Thursday, November 6, 2008

Project: Photo Accordion Book


Tonight, I gave a gift book to a very dear new friend. I decided over the weekend that I would make a small book for her. So I spent some time going through her Flickr archive looking for a photo I could use for the cover. It turned out, she has quite a collection of photos out there, and so I decided to print several pictures for her book.

Note: I was able to do this because my friend had not copyright protected her images on Flickr. If she had protected them, I would have needed her permission to use them, even in a gift for her. I would have taken that step, even though it would have removed most of the surprise of the gift.

I decided to use an accordion book. I assembled the book so it opens from both the bottom and the top. Before assembling the book, I decided that I would leave the book mostly blank for her to put in her pictures. Because she would be adding photos, I needed an artistic design for the inner pages that I could do, rather than embellishments added on top of photos. I decided to use Glimmer Mist and a Heidi Swap mask. Using three colors (Patina, Robin's Egg Blue, and Key Lime Green), I misted the backgrounds on both sides. I used papertowels to cover up pages that I didn't want to mist in each section. I made some more green and some more blue, mostly by the color I put on the top.

While the inner pages dried, I covered the covers with Bo Bunny striped paper, and then assembled the front decorations. I did a dry layout and used my digital camera to snap the planned layout for later. I went through my stash, and used some elephant stamps, a small compass, the word "journey," and a lot of flowers. I used a Tim Holtz ATC stamp to add some interest to the Bazzill library pocket. I used Peeled Paint distress ink to stamp the library pocket, and a series of green cateye chalks to distress the edges of things on the cover.

Next, I assembled the book, using a UHU glue stick to assemble the pages to the covers. I closed the book, and put it under something heavy in my office for an hour to make sure it was solid before moving forward. I added a few photos to the interior before I assembled the front cover. After the cover was finished, I went through and added tabs to many of the interior pages. As a last step, I used a small photo folder and attached it in the middle from the top, and inserted the remaining photos in it.


When I was finished, about an hour later (not counting drying time), I had a lovely gift I was proud to give. Total cost was under $10. My friend can use a Sharpie or a pigment ink pen to write captions on and around her photos after she assembled the whole album.

More pictures available on Flickr.
Project code: 280011

Saturday, November 1, 2008

Great Wide Open


I am in type of creative space that I don't encounter very often. This time, instead of paper or other art media, the blank canvas is my life. My work life to be more specific.

The last time I felt like my working future was this wide open was back in college. After spending 2+ years studying computer engineering, I realized that I needed to change my major. I spent about 6 months still in college, still taking a full time load, but totally experimenting with different kinds of courses. There was such a freedom I felt from admitting to myself and the world that my major was truly "undecided" at that point. After a while, I did find a direction, and that direction lasted until just recently.

Now, with the shifting going on in my life, and the changes taking place in my main client's business, I realized I was in a unique place. I decided that instead of just going out to find new clients who need exactly the same kind of work done, I would take some time to explore my options. What kind of work do I want to specialize in next? It turned out to be a huge question, one I'm still not able to answer.

I'm completely comfortable with saying that my immediate business direction and future is undecided right now. I've got enough money to support myself through this transition, and I'm really appreciating that I'm a saver right now! I'm considering some very diverse options, including:
  • Going back to college to get a PhD
  • Writing a book
  • Staring a new type of consulting work using social media
  • Writing another movie script
I'm going back through my work history, looking at everything that has been juicy in the past, and making a list of the things that totally engage me and inspire me today. It's been a lot of fun and quite interesting.

Ironically, during this time my studio has devolved into a clutter bin! My worktable is piled so high with supplies and other studio stuff. It's really too bad because I have a lot of Christmas presents that need my attention. I'm hoping to resolve the studio mess next week and start on the pressies.